CONTENT
In winter, even more so than in summer, being in the mountains alone is risky and dangerous. In case of a serious injury that makes it impossible to continue, you’ll be all alone. If you’re in an area without a mobile phone signal, the chances of survival in the cold winter environment are very slim. If you’re buried in an avalanche and can’t dig yourself out, there can be only one outcome: death by suffocation or hypothermia.
In winter, therefore, careful pre-tour planning, company of experienced mountaineers, appropriate equipment and knowledge of using it, and alertness to your surroundings are essential for a safe return to the valley.
This article is about using avalanche equipment and other recommendations can be found in the articles Safe winter mountaineering and Assessing avalanche danger.
AVALANCHE EQUIPMENT
The avalanche safety set has become standard for anyone serious about mountaineering in winter or any other time mountains hold a significant snow cover. it consists of an avalanche beacon, shovel, and probe. Avalanche backpacks are also used more and more often. All of this gear is used when moving on snow-covered terrain as it allows survival or, to put it more precisely, quick search for avalanche victims.
Without an avalanche safety set, you won’t be able to rescue a buried person in time – so you should know how to use it!
An avalanche beacon is a small electronic device that acts as a transmitter and receiver (when searching for a buried person) of electromagnetic waves of a certain frequency.
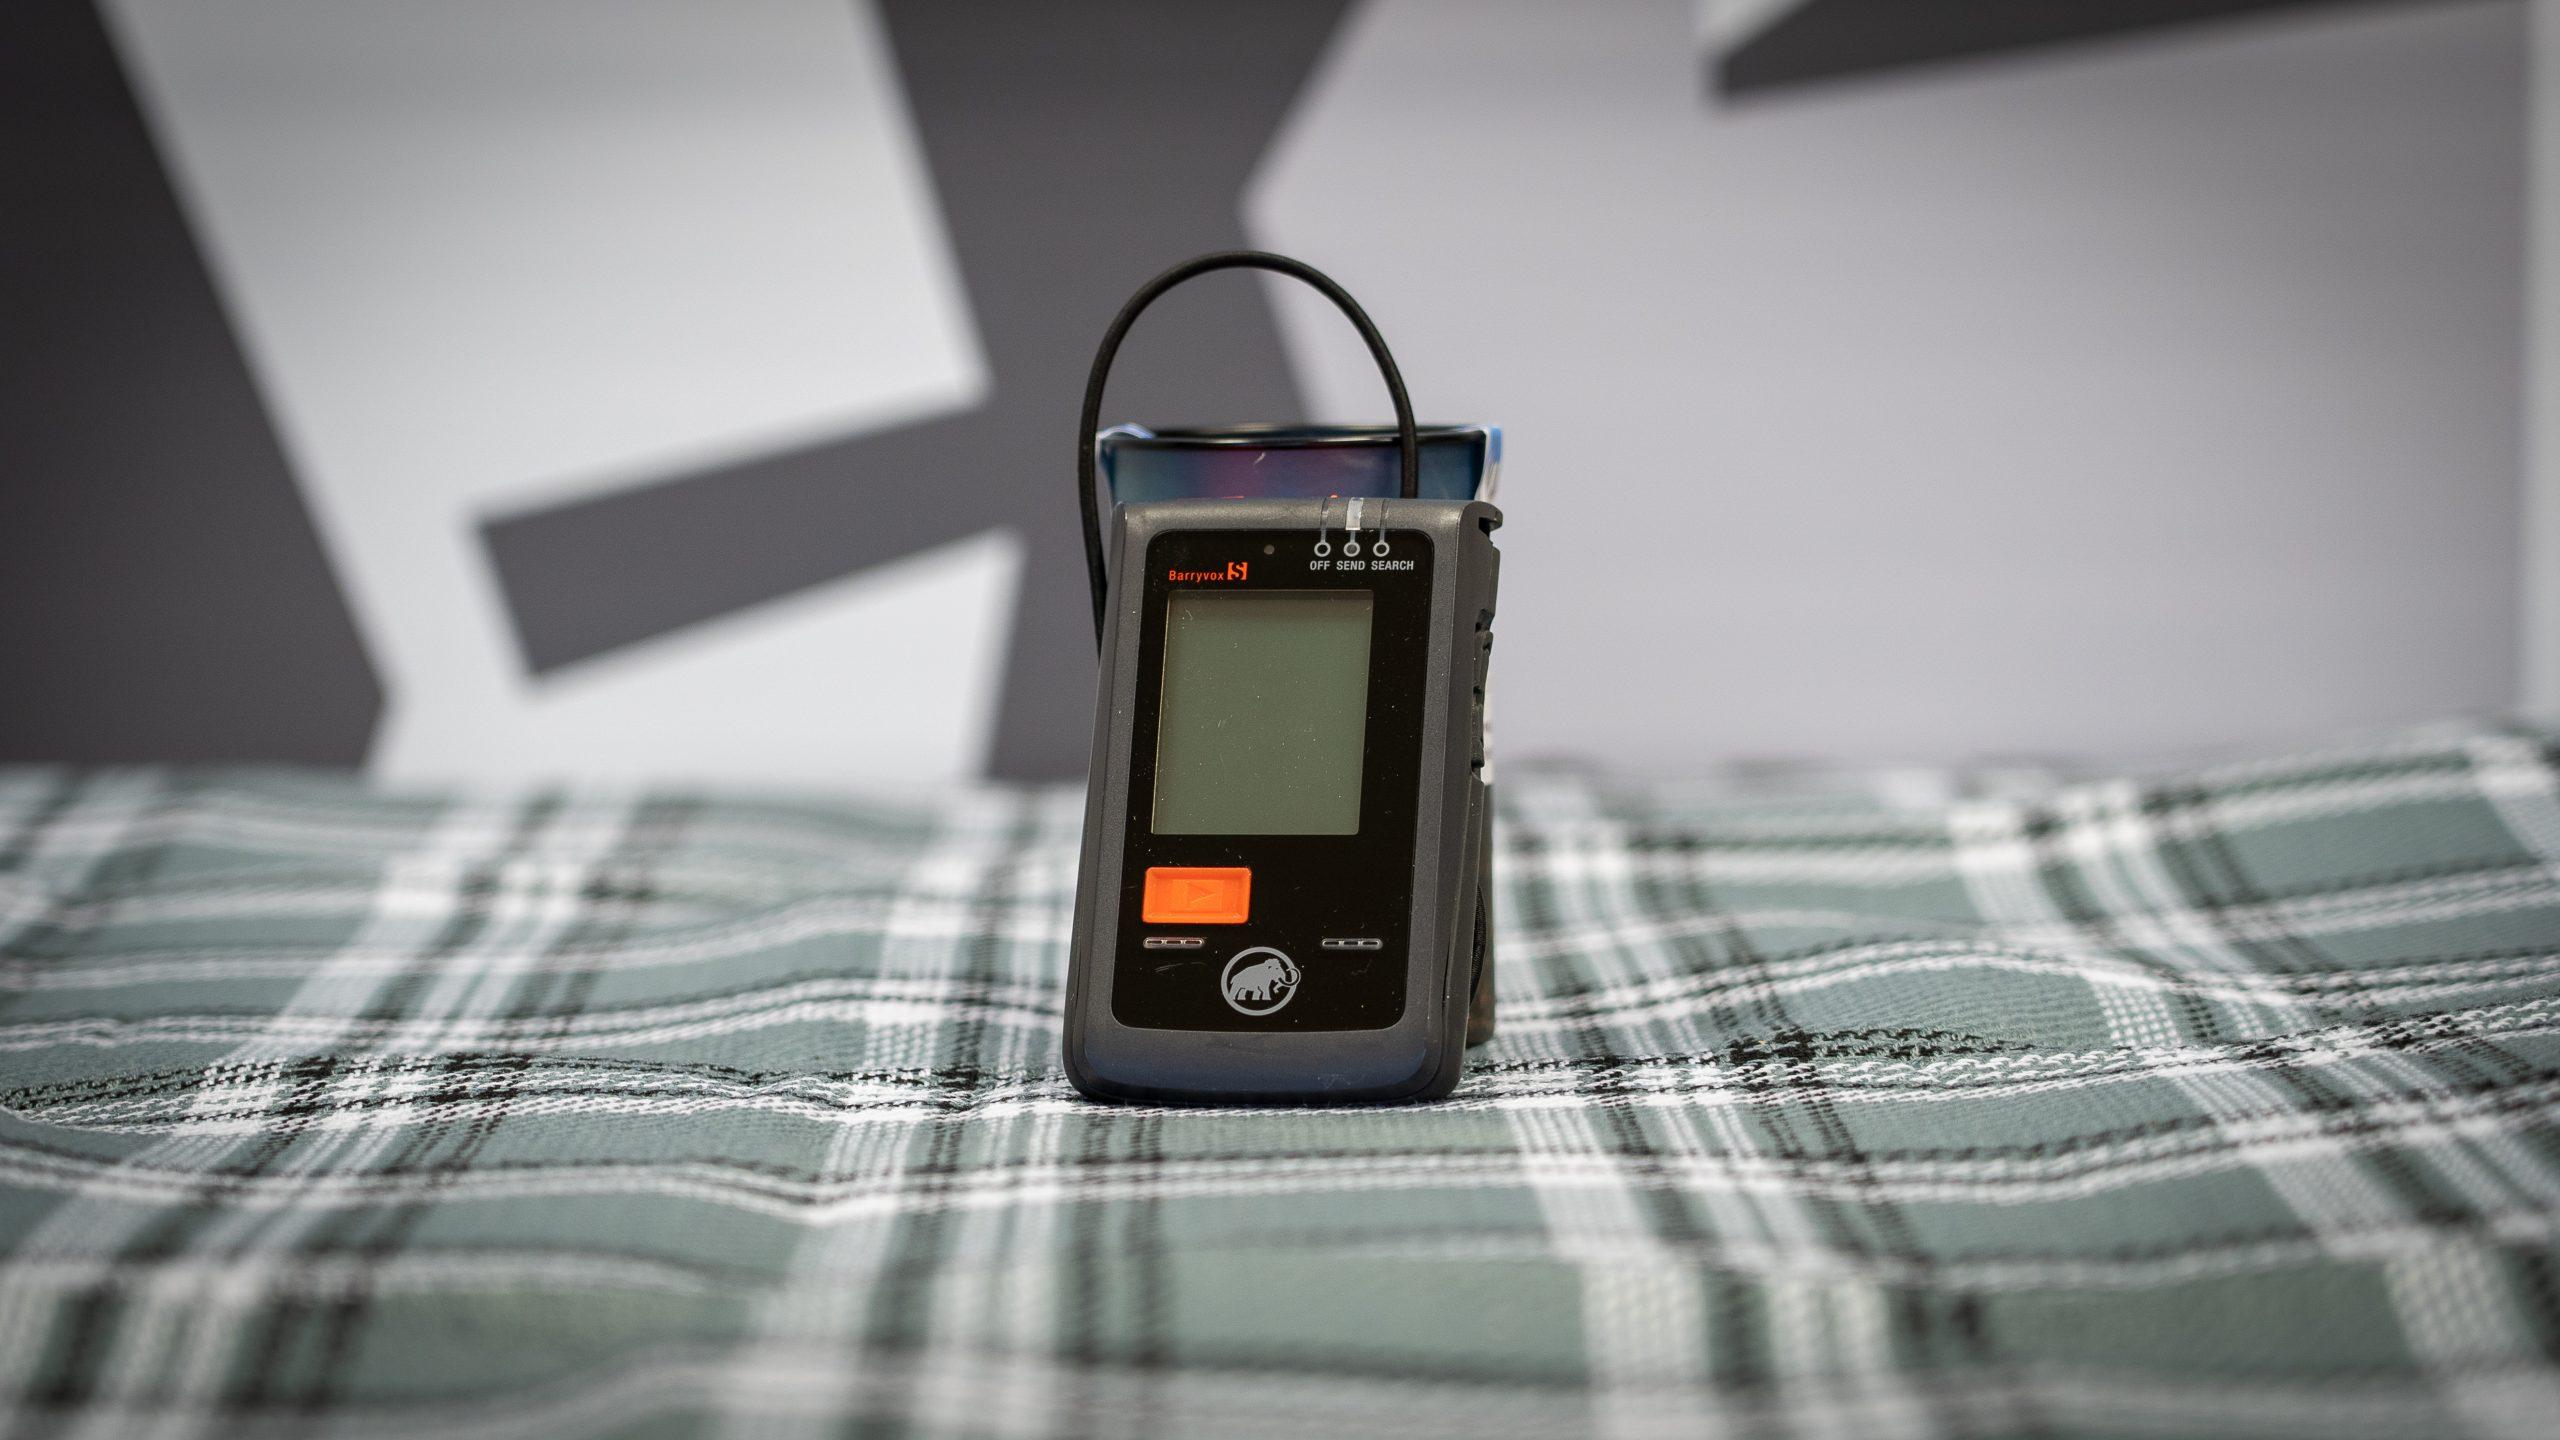
Photo: PZS/Peter Vrčkovnik
It’s placed in a special pouch worn above the first layer of clothing (never on the top) or in a pants pocket, which must be zipped. When walking, everyone in the group has it set to “send” mode. It’s switched into “receive” mode when searching for a buried person.
After determining the rough location of the buried person with the beacon, a probe is used to pinpoint their exact location. Otherwise, you could waste valuable time shoveling in the wrong place. The exact location of the victim is determined using an avalanche probe, a long, collapsible pole that is used to probe the snow. As strange as it may seem, an avalanche probe makes it relatively easy to distinguish between the different “objects” buried in an avalanche and you can quickly identify a body as opposed to a rock, wood, metal, etc.
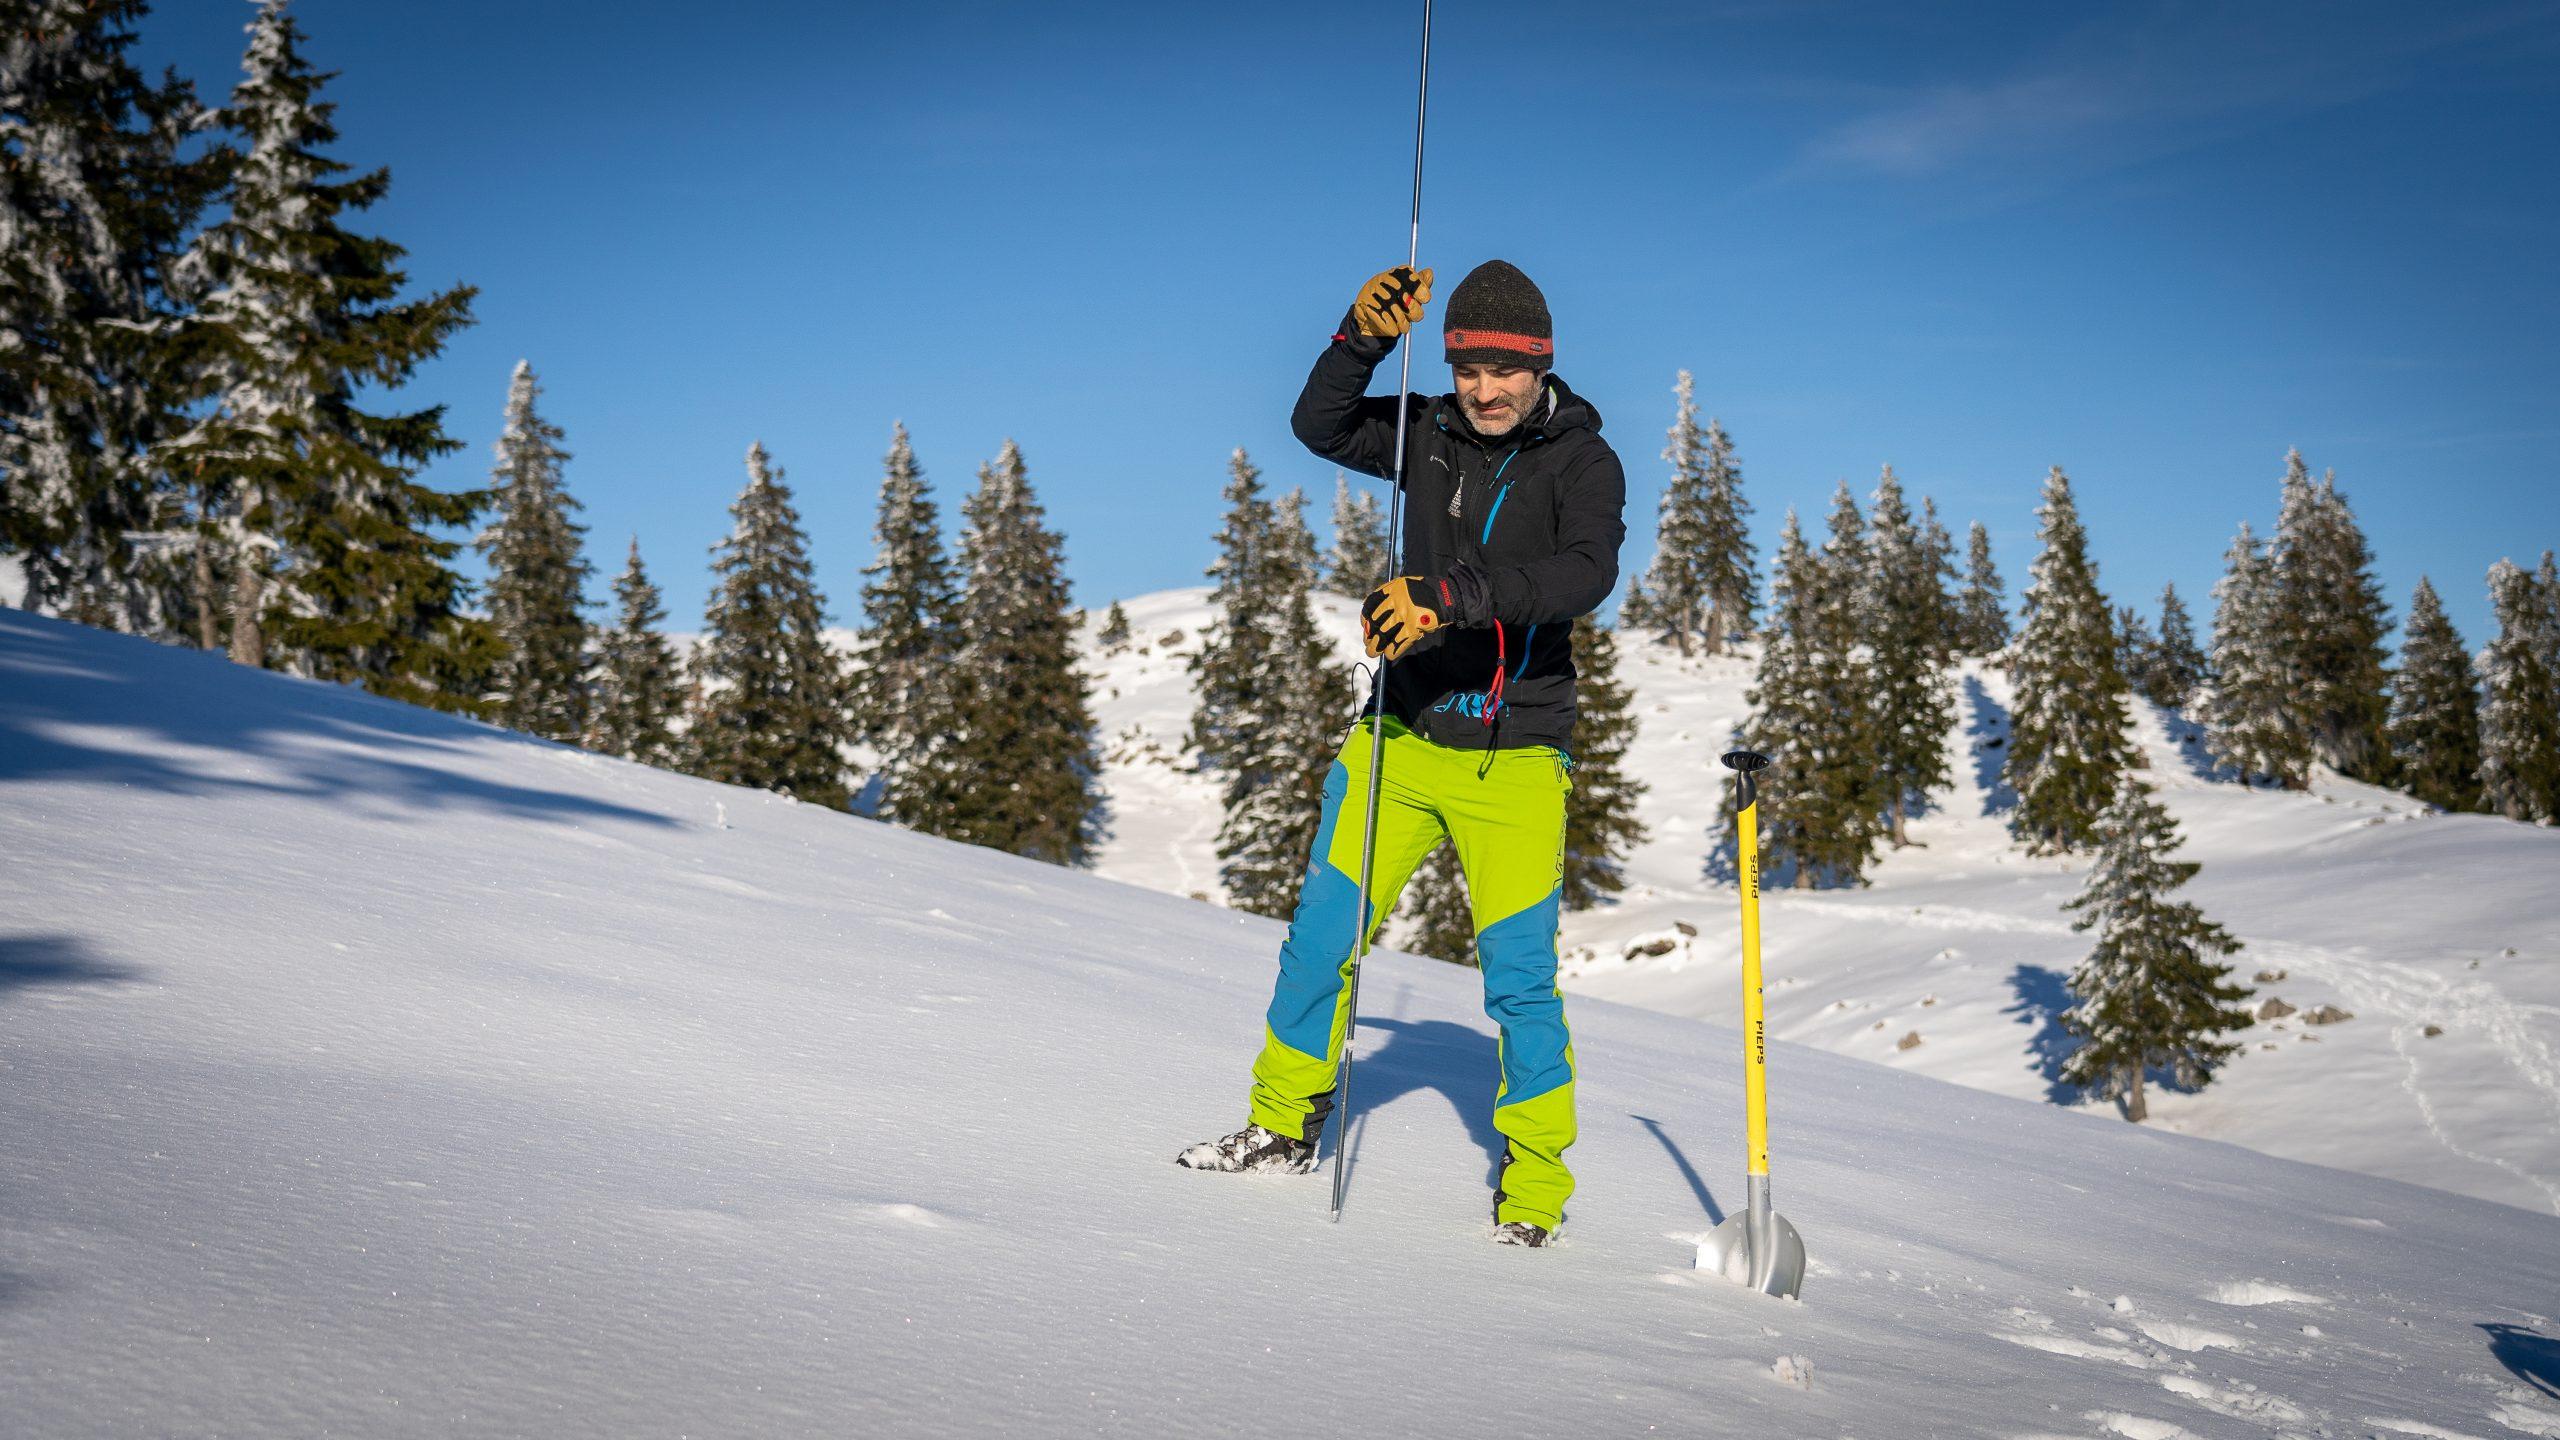
Avalanche probe. Photo: PZS/Peter Vrčkovnik
The located victim is dug out with an avalanche shovel, which should be light, collapsible, and made of metal. Shovels are also used for snow stability tests and when digging bivouacs. With some luck, you’ll mostly use it for digging out snow-covered parking spaces.
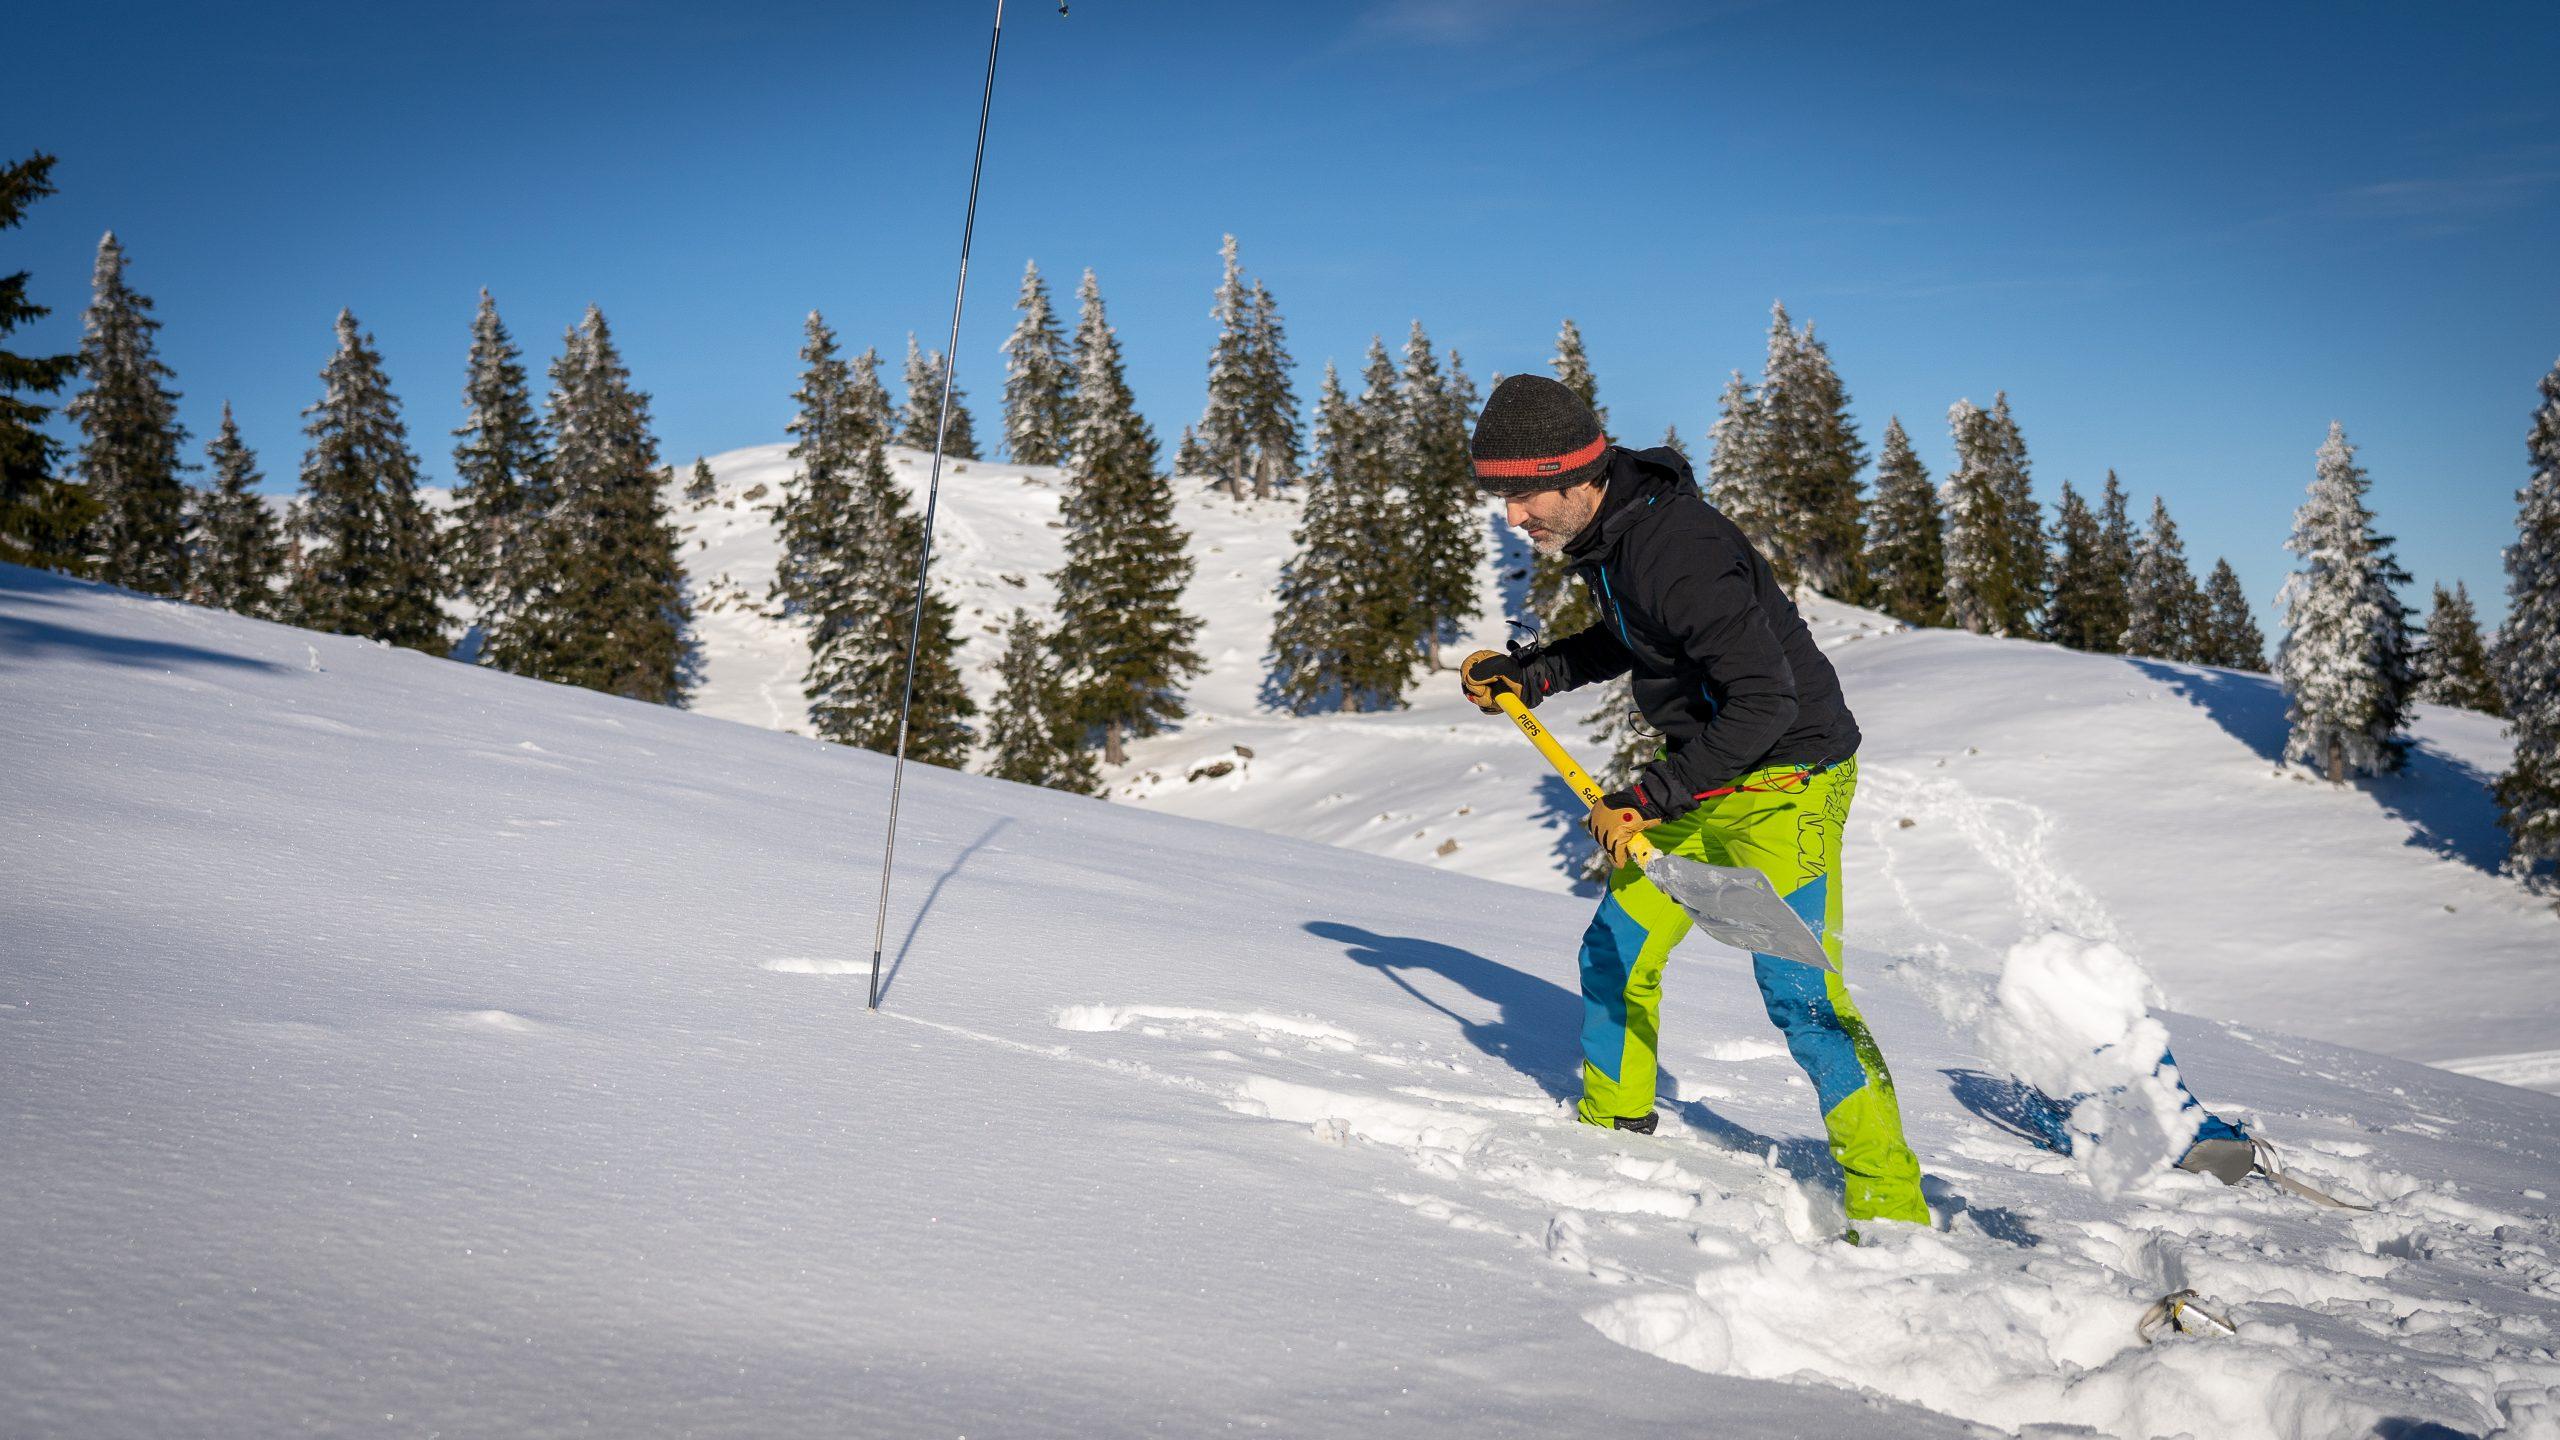
Avalanche shovel. Photo: PZS/Peter Vrčkovnik
An avalanche backpack is a tool that provides the greatest chance of survival in case you’re buried in an avalanche. The most important part of the backpack is the airbag, which inflates instantly with a pull of a lever. The inflated airbag keeps the victim on the surface of the avalanche and often prevents complete burial. We recommend it to everyone who frequently visits snow-covered mountains (ski tourers, for example).
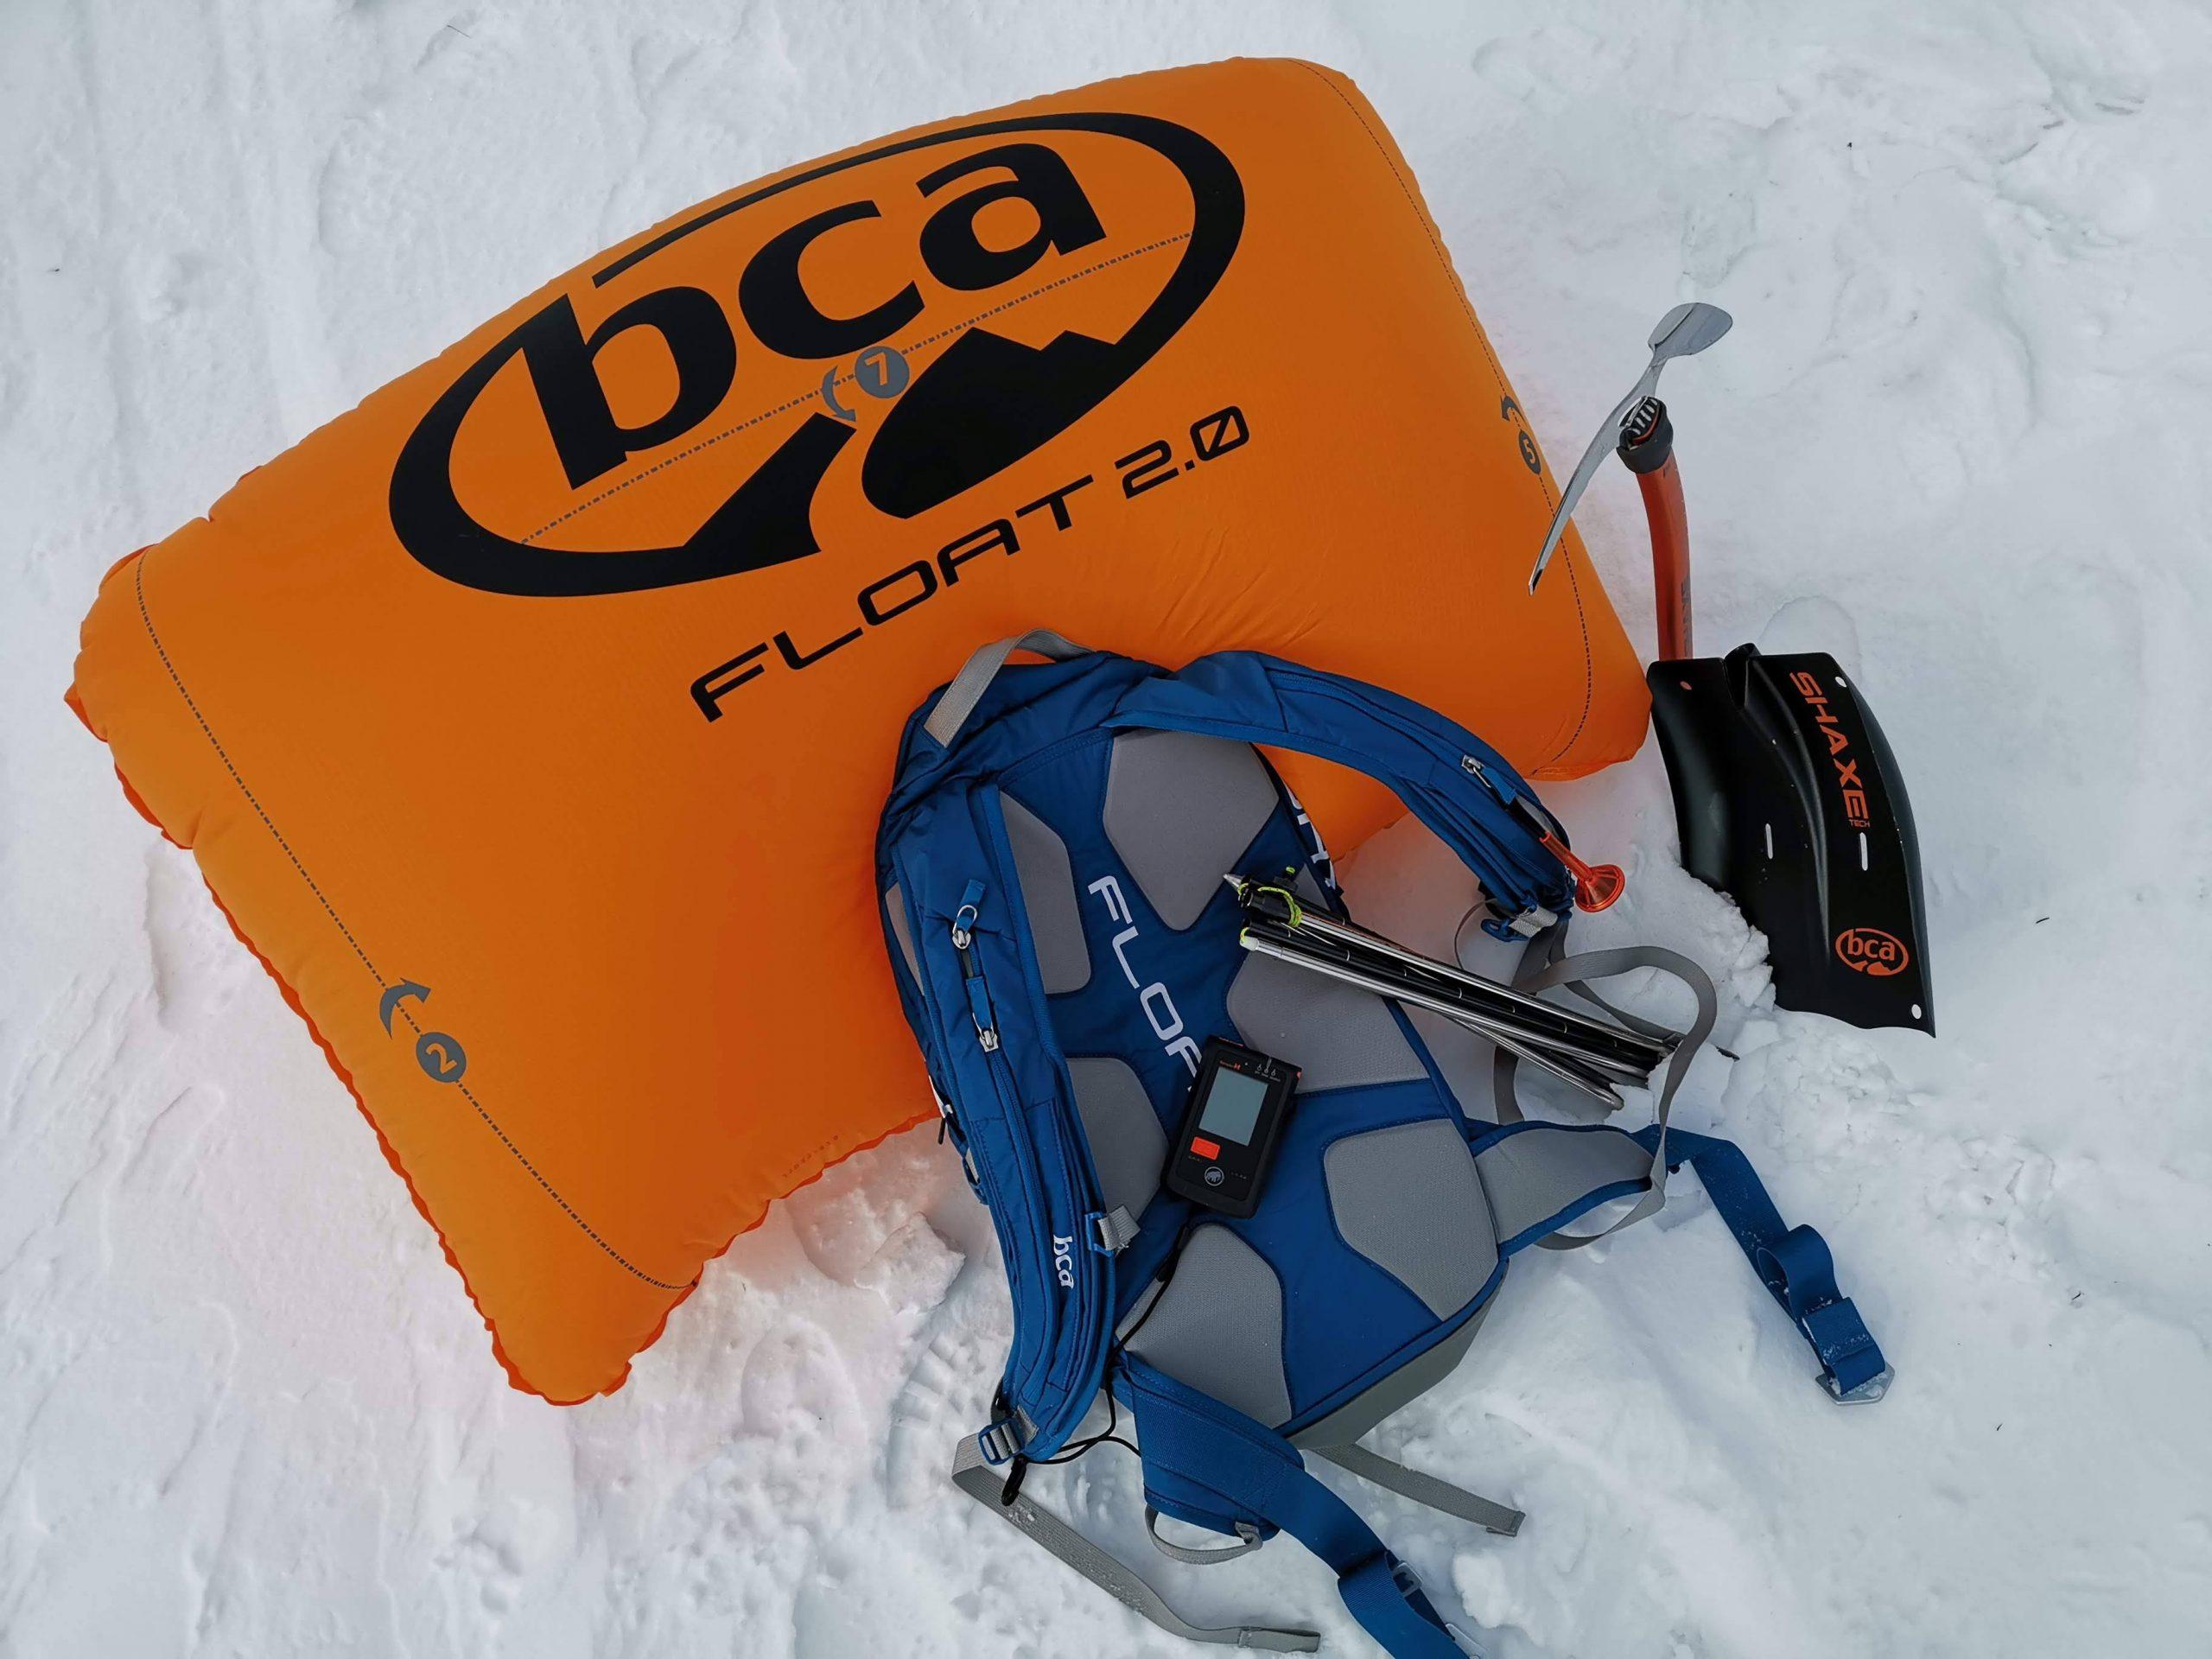
Avalanche backpack. Photo: PZS/Matjaž Šerkezi
It’s recommended that you avoid going into the mountains (especially onto steep and avalanche-prone areas) for at least a week after snowfall. Even the best and most modern avalanche gear (transceiver, shovel, probe, avalanche airbag) can’t prevent an avalanche from triggering and causing injury or death.
MEASURES AND PROCEDURES FOR SAFER TOURS
Even if you’ve prepared thoroughly for the tour at home and studied the avalanche bulletin, you should check the conditions at the starting point. The snowpack’s condition can quickly worsen (or improve) due to weather changes. If your tour starts deep in the valley, your data will be quite limited, but with some basic information you can still predict the conditions higher up with relative accuracy. Pay special attention to wind, temperature, and avalanches.
- If you see wind moving snow around on ridges and peaks, you can expect significantly worse avalanche conditions (risk of dry snow and slab avalanches) on windward slopes.
- Although temperature generally decreases with altitude, if it’s much warmer in the valley in the morning than forecasted, you can assume that it’s warmer higher up as well. Higher temperatures can cause wet snow avalanches, including the so-called gliding avalanches.
- Signs of recent avalanche activity (compared to photos from a day or two ago, freshly-covered tracks) are an indication that the surrounding slopes are unstable.
Conditions assessment is one of the key procedures of the 3 x 3 method, which is described in the Assessing avalanche danger article.
When you’re at the starting point ready to go, you should first check your technical equipment. When heading into avalanche terrain, it’s crucial that each participant has the proper avalanche rescue gear, and before each tour, a beacon check must be performed.
- The leader (preferably the most experienced member of the group) switches their beacon to “send” mode and everyone else switches to “receive/search” mode.
- The leader stands at the front of the line and other participants walk past the leader a few meters apart from each other (the distance between the leader and individual participants should be half a meter – not less!). The leader checks that their beacon is transmitting and that the participants’ beacons are receiving the signal.
- After passing the leader, participants line up a few meters apart from each other. Once in position, they switch their beacons to “send” mode and place them under their clothes. After the last participant passes the leader, the leader switches their beacon to “receive/search” mode.
- The leader walks slowly from participant to participant, actively checking that each participant’s beacon is transmitting by keeping their own beacon about half a meter (not less!) away from the participants’ beacons.
- Once the leader has checked the entire group, they return to the front, switch their beacon to “send” mode, and place it under their clothes.
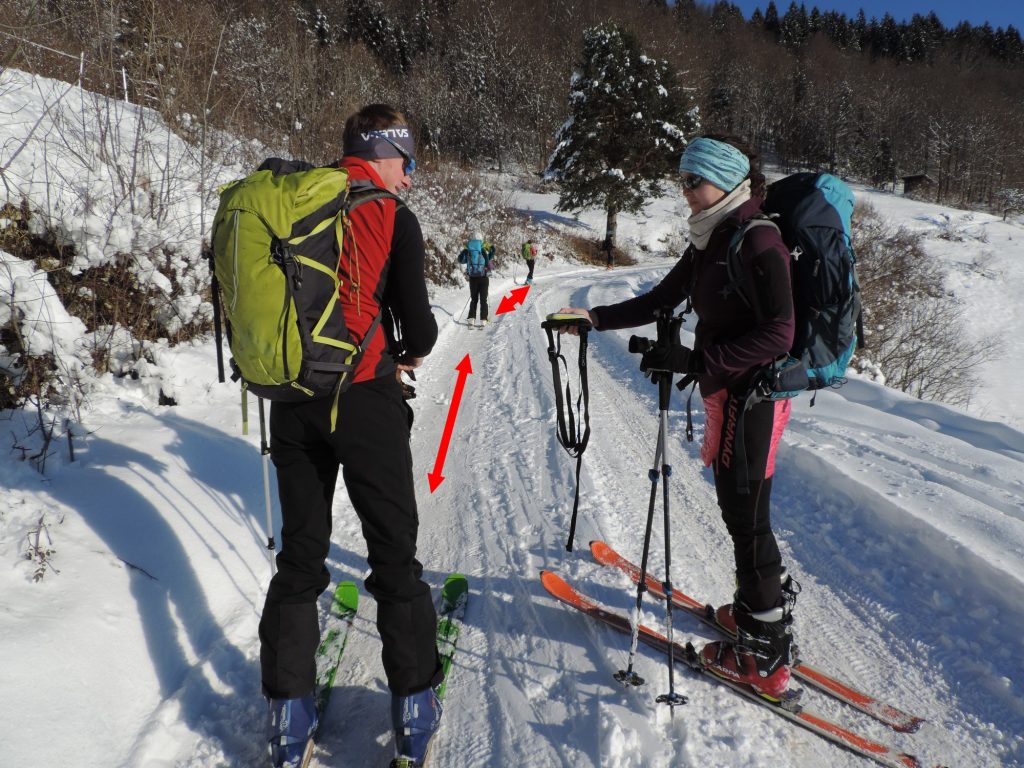
If all beacons are working correctly, the tour can start. Photo: PZS/Matej Ogorevc
- Keep a close eye on your surroundings for signs of recent avalanches, cracking and settling of the snowpack, terrain features, and snowpack conditions.
- Perform snowpack stability tests as needed.
- Choose the safest possible lines of ascent and descent – stay away from ridges, steep slopes, and bases of cliffs with large snowfields above them.
- Keep more distance between members of the group than in summer.
- Cross avalanche-prone slopes at their narrowest point to reach a safe spot as quickly as possible and minimize exposure.
- Cross avalanche-prone slopes one-by-one. Trees and rocks provide some shelter – cross below them.
- Assign an observer to watch the slope (from a safe location) and warn of approaching avalanches. If you have a burial victim, the observer should track the avalanche’s and victim’s path and remember the point of burial and the point where the victim was last seen.
Cross avalanche-prone slopes one-by-one. Foto: arhiv PZS/Matej Ogorevc
- Before crossing an avalanche-prone slope, put on warm clothes (sweater, jacket, hat, gloves) to protect you against cold if you get buried.
- Determine a quick escape route in case of an avalanche.
- Don’t wear pole straps, undo the buckles on the chest strap and the hip belt (keep the closed if you have an avalanche backpack), and make sure that your touring bindings are not locked. That way, you can quickly discard anything that might drag you down in case of an avalanche.
- Avalanche-prone areas must be crossed quickly, preferably going slightly downhill.
- On the other side, wait for the rest of the group.
Beacon checks should be performed before starting the tour and after longer breaks, especially after stopping in huts where you might take off your beacon and inadvertently turn it off.
IN CASE OF A BURIAL
The moment an avalanche starts dragging you down, the struggle for survival begins. An avalanche exerts enormous forces on the body, making resistance difficult but crucial. Therefore, it’s worth remembering a few guidelines:
- Try to escape the avalanche and get to the edge of its path as quickly as possible. Run downhill at a 45-degree angle to the direction of the avalanche. If you fall, try to self-arrest with an ice axe or grab onto fixed objects.
- If you notice you’re getting buried, immediately deploy the avalanche airbag (if you have one). Protect your mouth and nose as much as possible to prevent suffocation, the main cause of death in loose snow avalanches.
- Discard all the equipment (avalanche backpacks being the obvious exception) that might pull you deeper or hinder movement.
- Make swimming motions to stay near the surface.
- Before coming to a stop, try to rise to the surface and create an air pocket in front of your mouth. Take a deep breath to expand your lungs as much as possible, creating more space for air. Once an avalanche stops, the snow quickly hardens making further digging almost impossible.
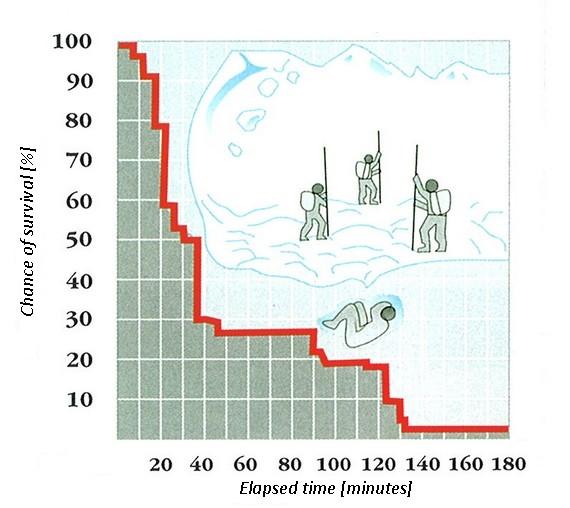
Research and experience show that the chance of survival for a buried person is nearly 92% if rescued within 15 minutes. The survival rate drops significantly after that, with only 15% of victims surviving if buried for two hours. The main cause of death is suffocation, which is why an air pocket is crucial. The second most common cause of death is injuries (broken bones, bleeding, head trauma, etc.). Hypothermia is next, which is why it’s crucial to cross avalanche-prone slopes in warm clothes.
COMPANION RESCUE
We’ve already mentioned the importance of observing your companions when crossing avalanche-prone areas. But still, avalanches often catch people by surprise. The procedure in avalanche emergencies is still the same in both cases. The main thing is to not panic – it’s better to take a few precious seconds to think than to blindly rush into a rescue attempt.
Initially, it’s important to track the victim’s movement in the avalanche and remember two locations:
- the point where the victim was caught;
- the point where the victim was last seen on the surface.
The locations are important because they help estimate the victim’s movement and determine where to start the search.
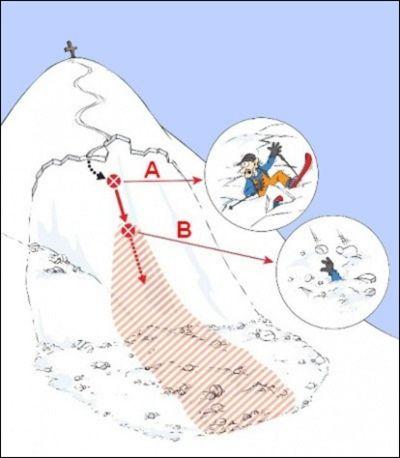 Overview of avalanche debris (A) – point at which the victim was caught, B – point at which the victim disappeared, Red area – primary search zone. Source: Ortovox
The second step is to ensure your own safety. If the group consists of several people, assign someone to watch the avalanche area from a safe point. If a secondary avalanche occurs, this person can alert the rest of the group. The same person can also call mountain rescue.
Only after these steps are complete should you proceed to the organization and execution of the rescue:
Quickly scan the avalanche debris and start a signal search with a beacon (provided that the victim and rescuers have one). The victim might not be completely buried and a leg or a hand might be visible. Listen for any calls for help (although under the snow, the buried person will hear you better than you will hear them). Don’t move any equipment that might be left on the surface, as it may help organized rescue efforts by mountain rescue services.
If the victim has a beacon, start searching immediately. Start with the signal search from the last seen point. After finding a signal, follow the flux lines of the victim’ beacon (coarse and fine search) to the point of the strongest signal, then perform pinpoint search using an avalanche probe.
Signal search
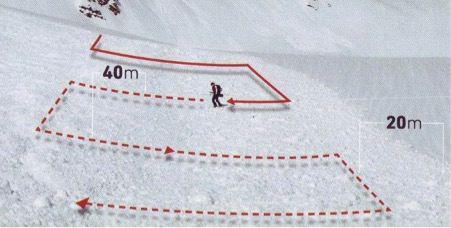
If you’re the only rescuer and the avalanche is not wider than 40 meters, search down the center of the avalanche debris. For wider avalanches (>40 m), use a zigzag pattern, keeping turns no more than 40 meters apart (some beacons have an even narrower recommended search strip – carefully read the user manual). Finish your turns about 20 meters from the edge of the avalanche debris (see image below).
Coarse search
Coarse search is conducted from the start of the signal to about 3 meters away from the buried person. The exact method of coarse searching depends on the type of avalanche beacon.
With digital beacons, follow the directional arrow on the display, which will lead you to the buried person along the flux line. Make sure that the distance displayed by your beacon is decreasing. If it starts to increase, turn around (180°), otherwise the signal will lead you to the buried person via a longer route (see diagram below).
With analogue beacons, use the coordinate system method. After detecting a signal, start moving in the direction of the stronger signal. When the strength decreases, return to the point with the strongest signal, reduce the receiving sensitivity (distance) by one unit, and again search for the strongest signal, moving perpendicularly to the original direction. After switching to the lowest distance, start with the fine search (see diagram below).
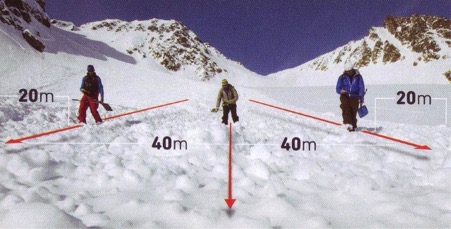
If there are multiple rescuers, the mentally strongest person should coordinate the rescue. One person is assigned to watch the avalanche area, another calls for help (mountain rescue services), and others start searching. Search in straight lines down the avalanche with distances between searchers depending on the range of their beacons (20-40 meters, see image below). After finding a signal, mark the spot with a shovel or some other object. Course search should be carried out by the most experienced member of the group, while others prepare a probe and shovels.
Fine search
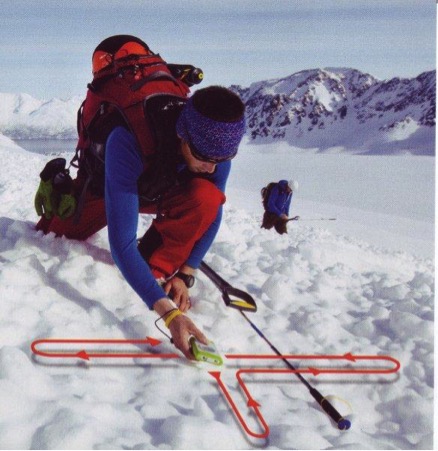
The described method applies to both types of beacons – analogue and digital (there are certain specifics, which is why it’s crucial to read the user manual). In fine search, the beacon is held just above the snow. Move the beacon slowly and evenly in a cross pattern. Don’t rotate your hand/beacon, which should always face the same direction. You’re looking for the smallest distance to the buried person, i.e. the strongest signal (see diagram below). When the smallest distance is found, mark it with a glove or some other object and start probing. Don’t waste your time looking for the smallest possible distance your beacon can display. Start probing within the approximate area of the smallest distance, as probing is much faster than fine searching.
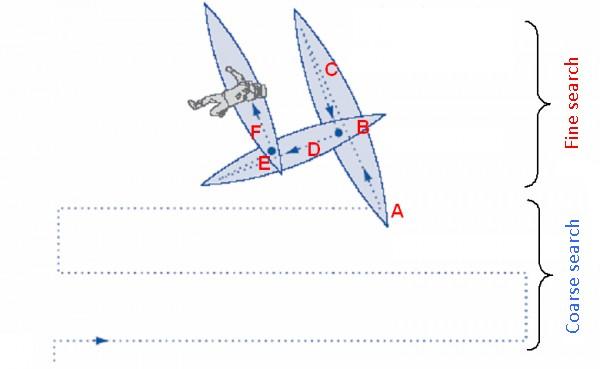
Coarse search using the coordinate system method: (A) – detect a tone, from (A) to (B) the tone increases, towards (C) it decreases. Return to point (B), reduce sensitivity, and continue searching moving perpendicularly to the original direction. (D) – tone strength increases again and at (E) it’s the strongest. Reduce sensitivity once again and change direction. (F) Increasing tone strength leading to the buried person. Source: bergpunkt.ch
Točkovno iskanje
Velja za obe vrsti žoln – analogno in digitalno (obstajajo posamezne specifike – potrebno nujno prebrati navodila). Pri točkovnem iskanju smo z žolno tik nad površino snega. Žolno premikamo počasi in enakomerno v obliki križa. Žolne/roke ne obračamo – žolna naj gleda vedno v isto smer. Iščemo najmanjšo razdaljo do zasutega oziroma najmočnejši signal (skica spodaj). Ko najdemo najmanjšo razdaljo, jo označimo (npr. z rokavico) in pričnemo s sondiranjem. Pri točkovnem iskanju ne izgubljamo časa z iskanjem najmanjše razdalje, ki jo lahko prikaže žolna. Nekako v območju najmanjše razdalje, začnemo s sondiranjem, saj je veliko hitrejše kot točkovno iskanje.
Always probe with gloves on and holding the probe with both hands. Probe perpendicularly to the surface, not vertically (see diagram below). The beacon leads you to the smallest distance to the victim, which may not be directly above them.
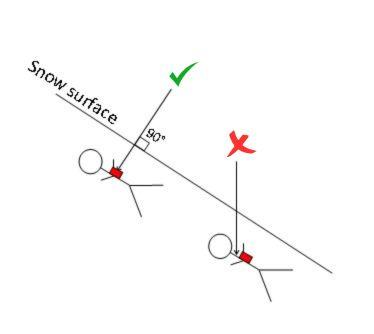
There are various probing methods, but they’re all quite similar. What’s crucial is that the distance between individual probe strikes as small (not more than 30 cm) to quickly locate the victim.

Different probing methods (A) in a square, (B) in a circle, (C) in a spiral.
When the probe hits the victim, leave it in place and start shoveling.
If a new avalanche occurs while probing, leave the probe in place so you can immediately return to the spot where the victim should be.
Never start shoveling right next to the probe (except if the victim is right under the surface). Instead, begin shoveling from a distance of one to one and a half times the burial depth downhill from the probe. Shovel in a V-shape, with the diggers passing the shoveled snow backwards instead of throwing it to the side.
Make sure to dig not only downwards but also to the sides so that you’ll make enough room to administer first aid and/or transfer the victim to a stretcher. If several rescuers are digging, they should rotate every minute. The first digger will get tired quickly due to the strenuous shoveling, while the last one will just be pushing the snow away and will be able to get some rest.
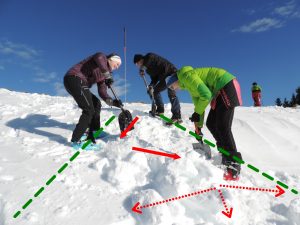
In the photo, the first rescuer is cutting snow blocks, the second is pushing it behind, and the third is clearing it away to clear the path. Photo: PZS/Matej Ogorevc
Shoveling is the most time-consuming part of the rescue. Beacon search takes about 2-5 minutes, probing up to 2 minutes, and shoveling time strongly depends on the depth of the burial.
It’s important to get to the head of the victim as soon as possible to clear their airways. The importance of quick searching and digging is shown by the survival curve (on the right). It shows the likelihood of survival through time.
Source: PZS/Branko Ivanek
The average time for rescuing a victim with a burial depth of 1 meter using a beacon, shovel, and probe is up to 11 minutes. The rescue time increases to 25 minutes if using only a beacon and shovel. If using only a beacon, it can take up to 2 hours. To fully dig out a victim, you’d need to dig approximately 3-4 cubic meters of snow (1-1.5 tons of snow)!
When reaching the victim, the first task is to uncover their head and ensure the airways are clear. Clear their mouth and nose and, if required, start resuscitation procedures. If the victim is conscious, protect them from the cold, provide first aid in case of injuries (immobilization of fractures or sprains, protection from the old, etc.), and wait in a safe spot for mountain rescue services.
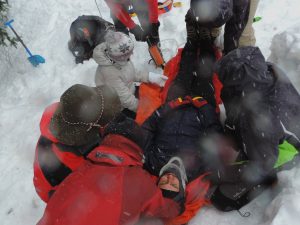
Photo: PZS/Matej Ogorevc
With some practice, caution, and attention, winter mountain experiences can provide unforgettable experiences. Winter tours are not the same as summer ones; backpacks are heavier, the equipment is different, the day is shorter, and many hidden dangers are lurking. With enough knowledge, however, and regular practice and experience, we can quickly become efficient in safely moving through winter mountains. Just remember to be patient and avoid being reckless; the mountain will wait and the snow doesn’t melt as quickly as it might seem.
