CONTENT
The more time passes since a snowfall (or strong winds that redeposit snow from one slope to another), the more cohesive the snowpack becomes. But how long does this take? That depends on various factors, mainly weather-related. Generally speaking, the greater the temperature fluctuations below and above zero degrees Celsius, the better the bonding of the snow cover (see image below). Ideally, the snow melts and settles during the day and freezes at night, or the temperature drops significantly after a period of relatively warm weather. If the temperature remains more or less constant, a warning should go off in our heads. With low temperatures, snow doesn’t transform (risk of loose snow avalanches), while at high temperatures, a snow layer can become so wet that it slides off the underlying layer because of its own weight (wet snow avalanches and slab avalanches).

Source: alpirocnik.rasica.org
The steepness of the slope is also an important factor. Most avalanches occur on slopes with inclines between 20° and 50°. On steeper slopes, snow tends to sluff off on its own, while on slopes gentler than 20°, avalanches rarely trigger. But beware: if an avalanche is triggered higher up the mountain, it can continue moving across very gentle slopes before it stops.
Avalanches can be blocked by vegetation (shrubs, trees, old tree stumps) and obstacles (rocks, bumps). The more obstacles acting as brakes on the terrain, the lower the chance of an avalanche occurring. But this is only true as long as these obstacles aren’t completely covered by the snowpack. Once that happens, most avalanches occur due to the previously mentioned factors.
ASSESING AVALANCHE DANGER BEFORE HEADING OUT
Assessing avalanche danger can be a very difficult task. A multitude of data must be considered and interpreted correctly. In summer, checking the trail conditions a day or two before the trip might be enough, but in winter, we need to start planning much sooner than that. The snowpack can transform in a day or two or it may take as long as two weeks – depending on the weather, winds, slope aspect and gradient, and other factors.
Avalanche reports and bulletins make the decision-making somewhat easier, but we should still embark on winter tours with due respect and caution.
An avalanche bulletin is basically a report on avalanche danger. In Slovenia, these reports are issued by the Slovenian Environment Agency (ARSO).
They publish the bulletin on website crossrisk.eu during winter when there’s enough snow for avalanches to be a threat. It’s usually issued three times a week, but sometimes even more frequently, if the conditions are especially tricky (after heavy snowfall, for example).
The bulletin/report includes the following:
- current state of the snowpack (in different mountain ranges and at various altitudes),
- general danger level,
- risk assessments,
- current snow conditions,
- forecasted weather development and condition trends.
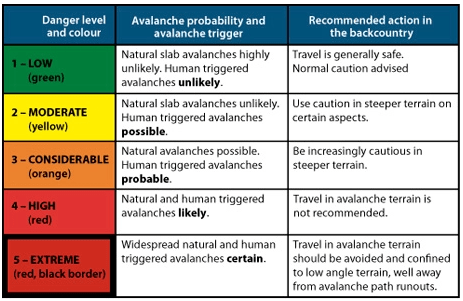
The scale uses five levels (from 1 to 5) to describe the stability of the snowpack, with 1 being the least dangerous and 5 the most.
Even though level 5 is the most dangerous, most avalanche-related accidents occur at levels 2 and 3, as these “low” ratings often mislead us into venturing onto risky slopes.
Fewer accidents occur at higher danger levels mainly because fewer people are in the mountains. Reports/danger assessments according to the European five-level scale are provided in avalanche bulletins, which can be easily found online. The danger level can and should be checked at home before going on a trip.
Source: avalanche-blog.com
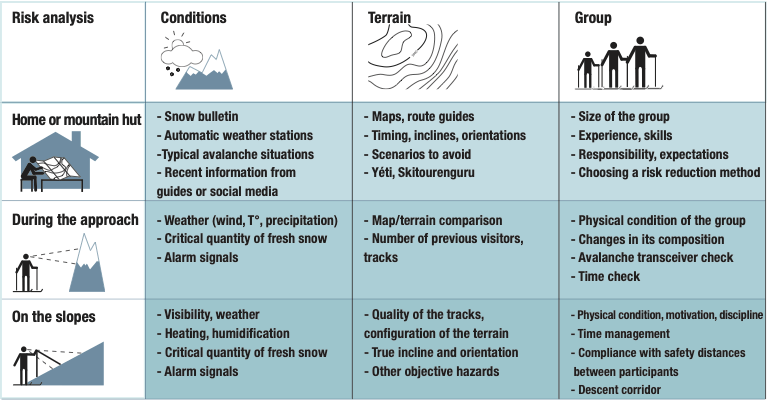
This method considers three avalanche factors for assessing avalanche danger: weather and snow conditions, terrain, and people. All three of these criteria are checked on three levels: at home or in mountain hut during planning (regional), in the mountains during the approach (local), and on the specific slope we are on (zonal). Hence the name 3 x 3 (3 factors x 3 levels). By considering the factors at each level, we can make an assessment whether to continue with our itinerary (or embark on it in the first place) or not.
Source: Petzl fondation
It’s recommended that you avoid going into the mountains (especially onto steep and avalanche-prone areas) for at least a week after snowfall. Even the best and most modern avalanche gear (transceiver, shovel, probe, avalanche airbag) can’t prevent an avalanche from triggering and causing injury or death.
SNOW STABILITY TESTS
At the starting point and during the whole trip, we should constantly be on the lookout for potential avalanches. Our own gut feeling should not be ignored, although it has been known to fail mountain enthusiasts. It’s difficult to rely on personal feelings, which can change from one hour to the next. It’s therefore essential to be competent at various techniques for checking avalanche danger in the field.
Snow pits are the basis of all the following snow stability tests. We dig a meter-wide hole (make sure to dig vertically) to a depth of 1.5 meters or to the ground if there’s less snow. The side is smoothed and a vertical line is drawn with a finger (in gloves!) from the ground to the top, monitoring the hardness of the snow layers.
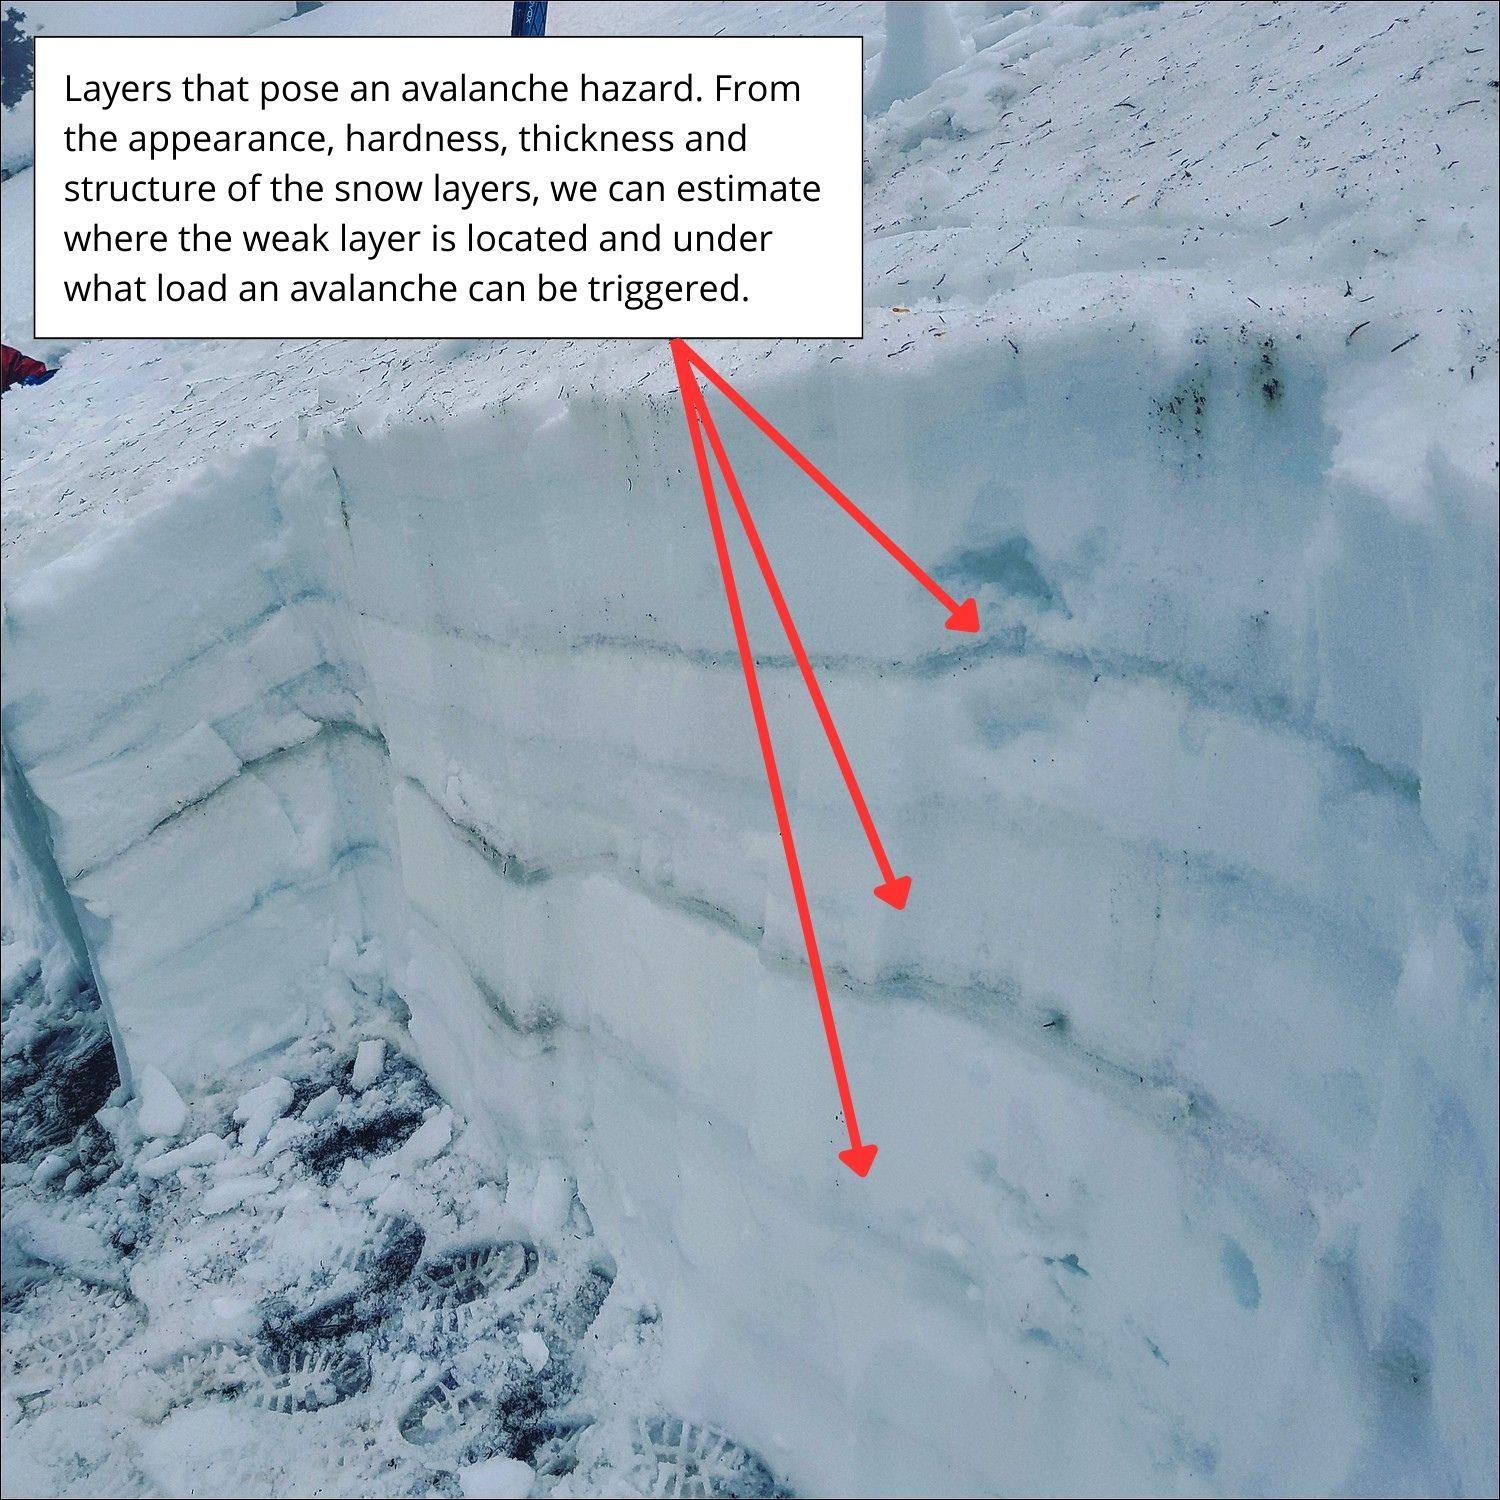
Foto: PZS/Matjaž Šerkezi
Each layer is marked with horizontal lines and its hardness is assessed based on whether we can push our hand or object into it:
- fist (softest layer),
- open hand,
- one finger,
- pen,
- tip of a knife.
This is done for each snow layer, determining its hardness, and based on this assessment, the number and depth of critical layers.
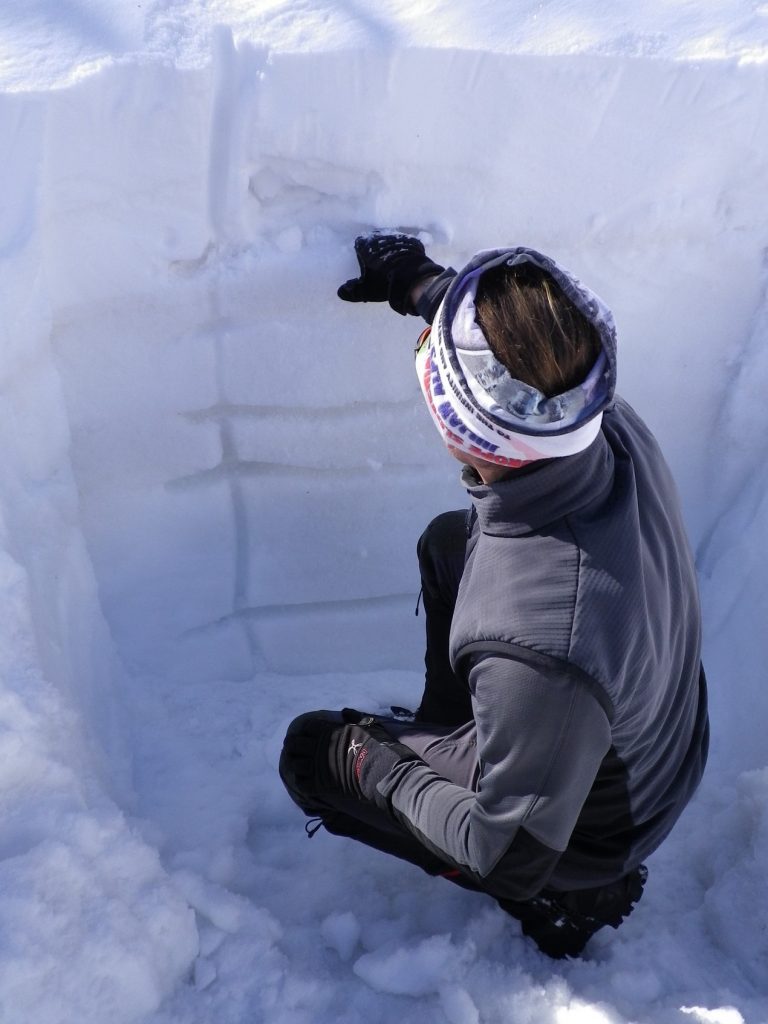
Photo: PZS/Matej Ogorevc
The following layers are the most critical:
- layers with a significant difference in hardness (soft snow on a hard, icy layer, for example);
- very soft (a fist pushes into the snow) and thick layers;
- very moist layers (dripping when compressed);
- layers made up of pellet-shaped snow (sleet, depth hoar). These have a similar effect as marbles and are an ideal sliding surface;
- layers with air pockets.
The compression test is used to identify critical layers using dynamic loading (impacts) on a test column. This is a simple and quick method.
If you’ve already built a snow pit, smooth out the front face once again. Cut out and isolate a column the size of an avalanche shovel (approximately 30 x 30 cm). A snow saw or thin cord with knots can be used to easily cut through the snow. Remove the freshly fallen snow and place the shovel blade (facing down) on the column. By striking the shovel, you gradually load the snow column to determine its stability.
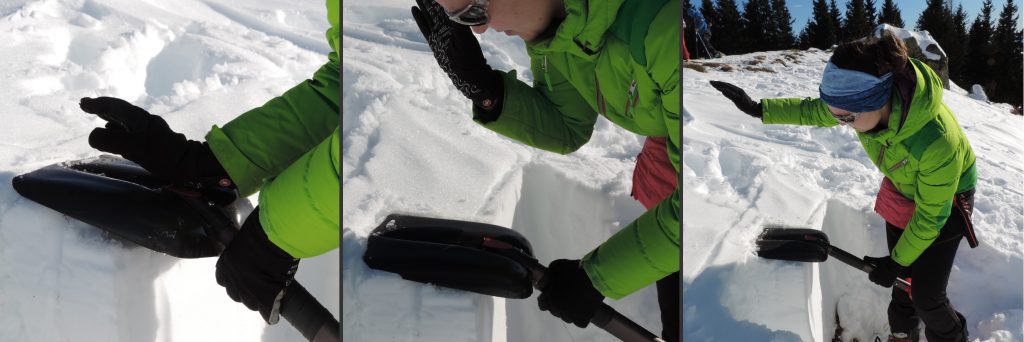
Photo: PZS/Matej Ogorevc
Start with 10 fist strikes (left image), followed by 10 elbow strikes (middle image), and finally 10 shoulder strikes (right image). Stability of the snowpack is assessed based on the number of strikes needed to break the layers. If the column doesn’t collapse after 13 strikes – 10 from the fist and 3 from the elbow – the snowpack is considered stable.
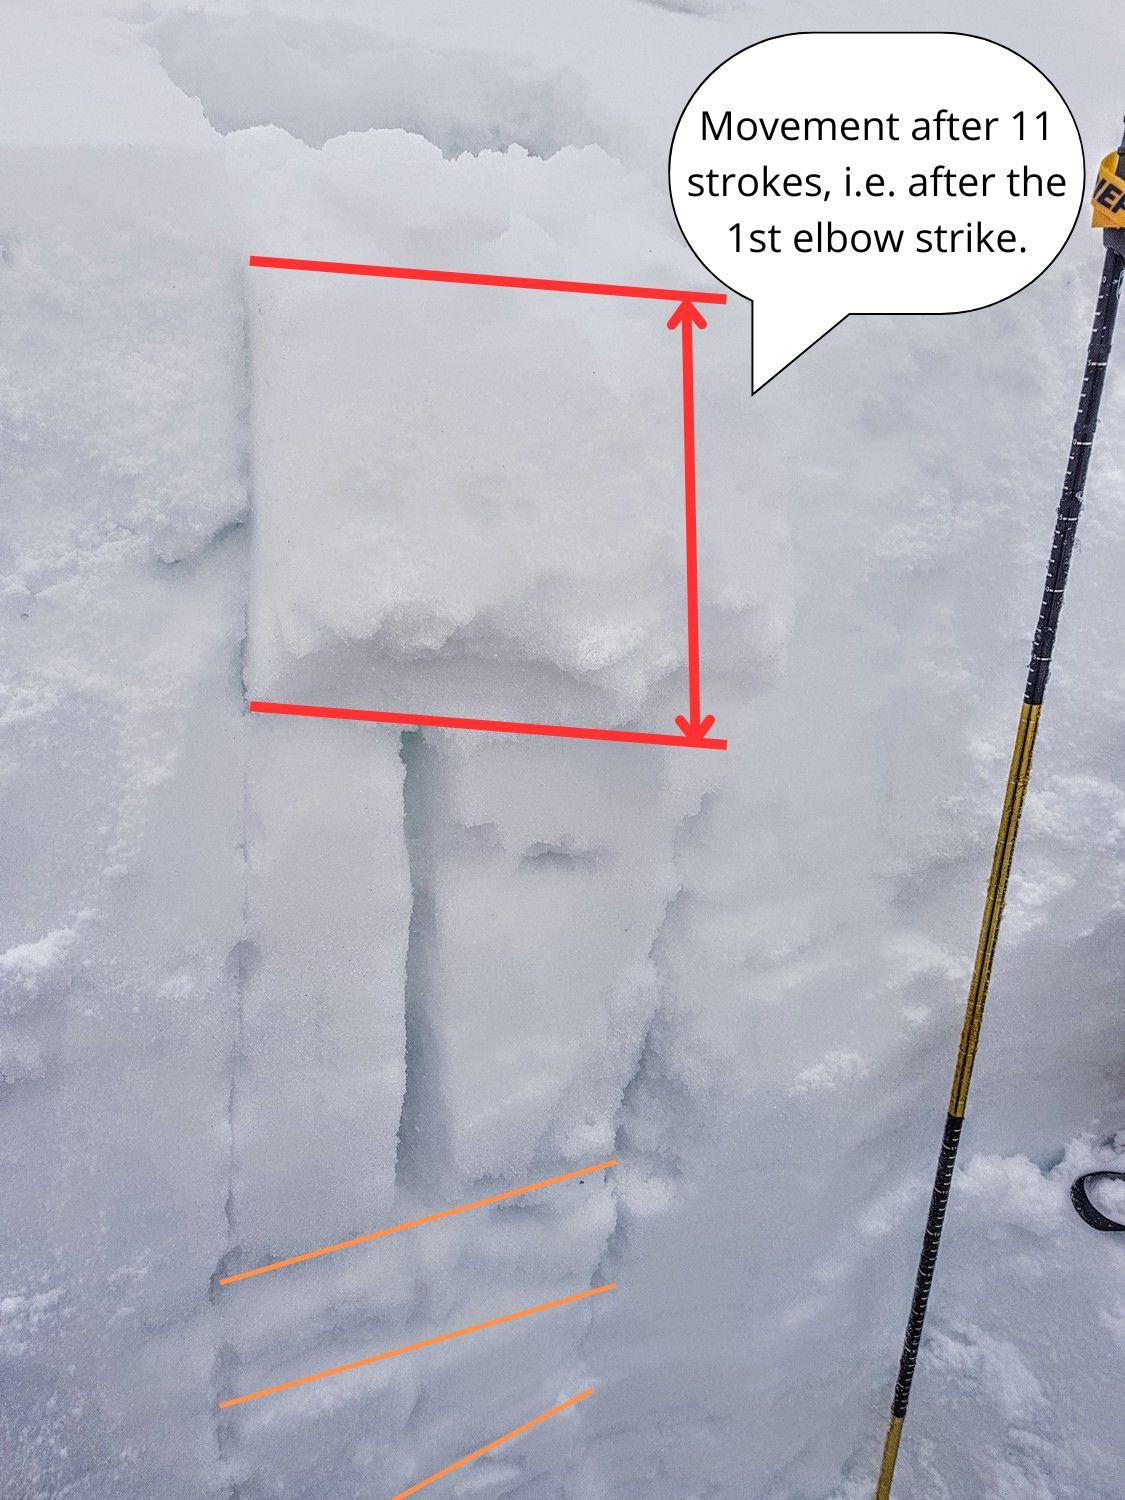
Photo: PZS/Matjaž Šerkezi
The ECT method is similar to the CT method, except that the column is wider (3 shovels width or about 1 meter). The test is performed at the very edge of the column and is otherwise the same as the CT method.
Photo: PZS/Matej Ogorevc
The advantage of the ECT method is that it better monitors the height and spreading of cracks in the snowpack and, consequently, more critical layers can be identified (image below).
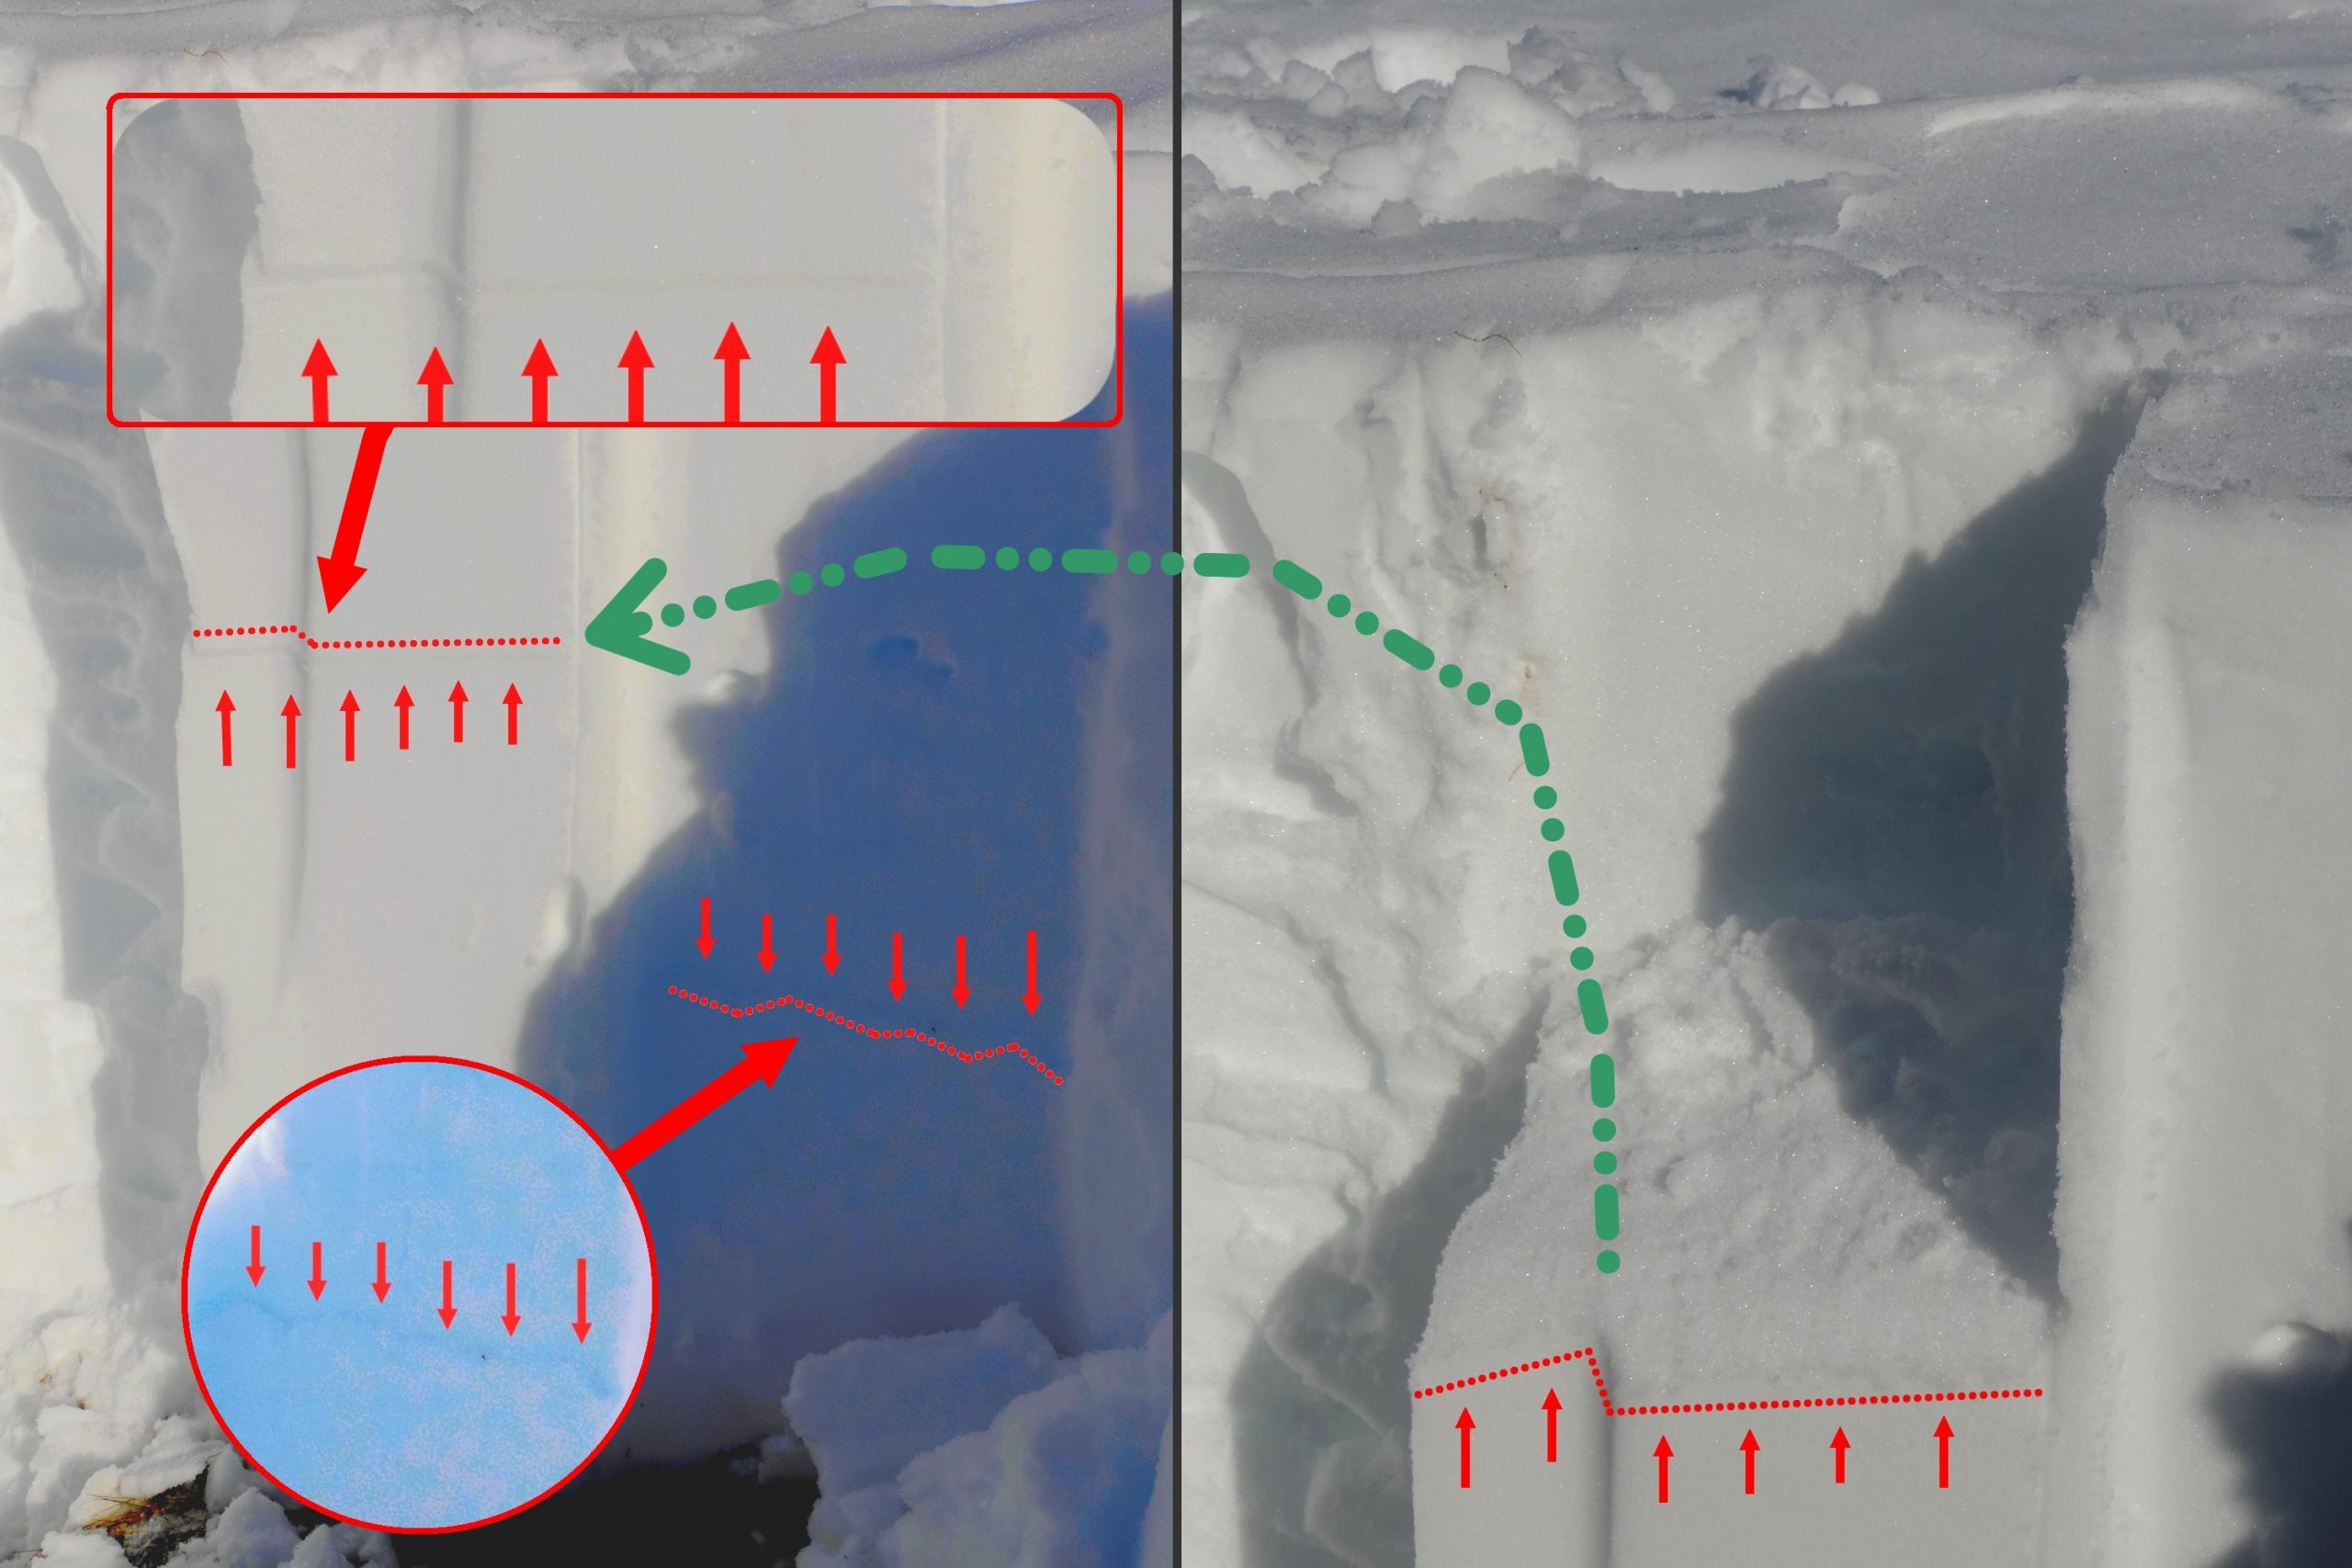
Photo: PZS/Matej Ogorevc
Of all the methods described here, the Norwegian method is the oldest and most well-known among experienced mountaineers in Slovenia. However, it takes more time than the previously described methods.
To start off, you need to build a snow pit and clearly identify individual layers in the snowpack. After the snow pit is complete, you must cut its front side perpendicular to the snow surface. This ensures that the shape of the front of the pit doesn’t interfere with the sliding of the individual layers as the Norwegian method is a sliding test.
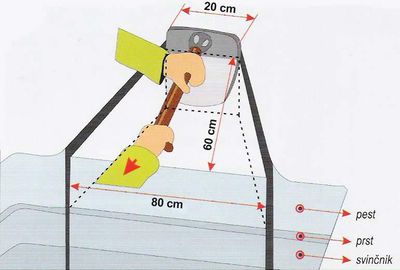
Remove any newly fallen snow and cut a trapezoid (using a shovel) with the following dimensions: the front (longer) side is 4 shovel widths (about 80 cm), and the height of the trapezoid is 3 shovel widths (about 60 cm). Connect the sides with straight lines. The Norwegian method tests the sliding of individual snow layers so cut only to the depth of the layer you want to test.
Source: alpirocnik.rasica.org
After making the trapezoid, flip the avalanche shovel and insert it behind the trapezoid, but only to the depth of the layer you wish to test. Gradually load the layer by pulling on the shovel parallel to the surface of the snow (bottom right image). The sooner the layer slides, the greater the avalanche danger. Repeat the process for all suspicious layers.
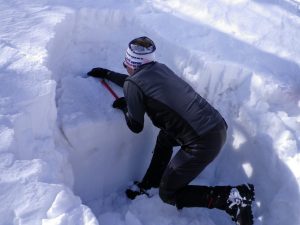
Photo: PZS/Matej Ogorevc
In most cases, people trigger avalanches themselves. That’s why it’s essential that to take the time, at home and before going on the trip, to determine the slopes that provide the most safety. Wide and gentle ridges are the safest, while narrow ridges, couloirs, and steep slopes with windblown snow are the most dangerous. Keep in mind that an avalanche might trigger above us, even on steep walls. Big alpine walls are full of ledges that hold snow, which can slide down at any moment. Many mountaineers have met their end in avalanches that came down from seemingly safe walls.
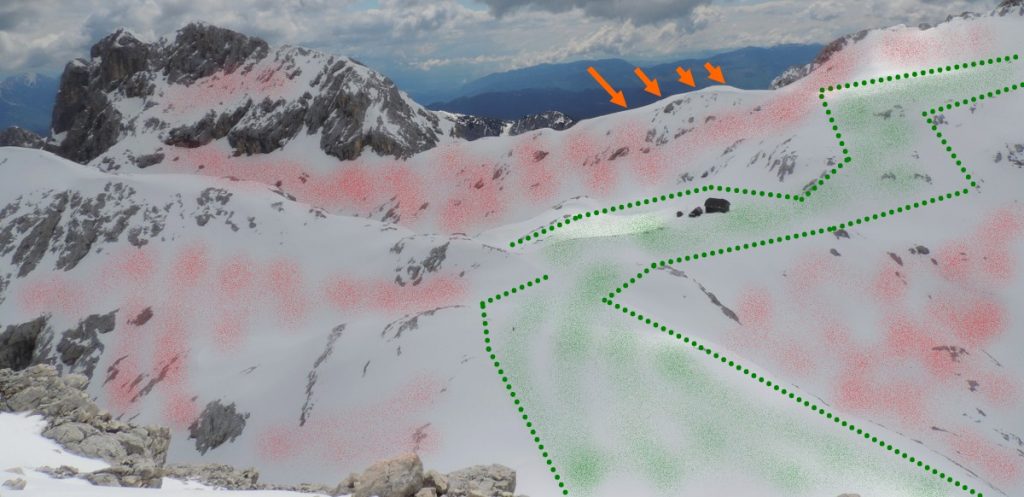
An example of avalanche-exposed areas (red – steep slopes, areas below walls with large snowfields above them) and less exposed areas (green – wide ridges, potentially bottoms of very wide valleys). Narrow ridges are relatively safe regarding avalanches, but cornices on and below the ridges can be extremely dangerous. Especially during warm spells, they break, crash into the valleys, and often trigger avalanches on slopes below. Photo: PZS/Matej Ogorevc
With knowledge, experience, and a bit of caution, we can reduce the risk significantly. It’s essential, however, to monitor the local weather for an extended period of time before going on a tour, recognize avalanche terrain while on a tour, and take appropriate actions.

